How to Print Labels and Stickers on One Sheet
Arrange fifteen 2-inch square labels on full-sheet Letter sticker paper. Use exact gaps and margins, then print and cut the sheet yourself.
Use full-sheet sticker paper for this workflow
Here is how to print labels and stickers on one sheet using a finished label design and full-sheet adhesive paper. The example places fifteen 2 x 2-inch square labels on portrait US Letter paper, with three columns and five rows. You print the arranged PDF and cut the pieces yourself. This workflow is for uncut full-sheet stock. PrintGrid Pro does not provide a catalog of numbered pre-cut label templates, and this guide does not promise alignment with a branded pre-cut sheet.
It also does not create a cutter-machine project or registration file. A visible cutting outline on a PDF is a guide for finishing the printed sheet. If you require a particular die-cut label product, use its manufacturer's matching template and instructions instead of substituting this centered grid. The label stock determines which workflow is appropriate.
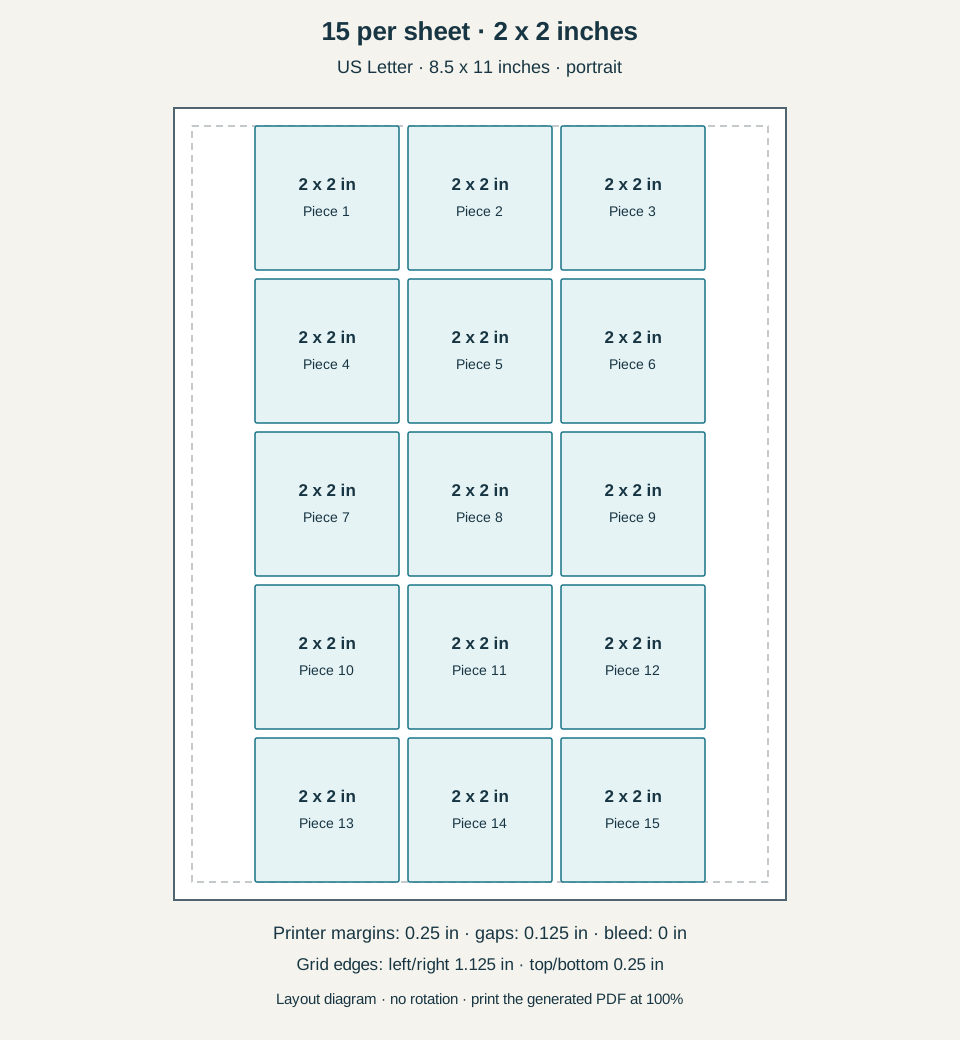
Exact layout settings in inches
| Setting | Value |
|---|---|
| Paper | US Letter, 8.5 x 11 inches, portrait |
| Each piece, width x height on sheet | 2 x 2 inches |
| Printer margins, all four sides | 0.25 inch |
| Horizontal and vertical gap | 0.125 inch |
| Bleed | 0 inches for this example |
| Rotation | Off for this diagram |
| Grid | 3 columns x 5 rows, 15 pieces |
| Actual centered grid distance from paper edges | Left/right 1.125 inches; top/bottom 0.25 inches |
| Print scaling | Actual size or 100%; one PDF page per side |
The 0.25-inch printer margins define the permitted area; the centered grid can leave more white space outside the pieces. Your printer may need larger margins. Increasing margins or gaps can reduce the count. These settings describe artwork without bleed and a fixed orientation, not a claim that every possible layout has the same capacity.
Prepare a readable 2-inch label
Create the complete square label in your design tool, including text, artwork, and any white border you want to retain. Export a PDF, PNG, or JPEG. At 2 x 2 inches, a 600 x 600-pixel image supplies 300 pixels per inch. Small text still needs checking at printed size; a large monitor view can hide how tiny an ingredient line or address will look on a jar or envelope.
This example uses zero bleed, so a white border or comfortably inset design is a practical choice. For an edge-to-edge background, extend the artwork in the original file and work through the separate bleed guidance. The app cannot invent missing edge artwork. Do not increase the bleed control without checking how it moves the finished cut boundary inward.
Upload and choose one design or a same-size set
Upload the local file, confirm a 2-inch width and 2-inch height, and use Rectangle. Equal dimensions make the label square. Use Repeat one for fifteen identical labels. Use Multiple designs when you have several finished labels sharing the same size and shape, such as different flavors or gift messages. Set each quantity and inspect the thumbnails. Personalization happens in your source designs, not through a mail-merge feature in this layout.
Keep the source free of a whole-page label grid unless that grid itself is what you intend to print. Repeating one finished label lets the app calculate the spacing. If the source contains an unintended page margin, it becomes part of the repeated artwork and can make the visible label appear smaller than expected.
Build the fifteen-label Letter layout
Select Letter portrait, 0.25-inch printer margins, and a 0.125-inch Gap. Set fifteen copies. Three 2-inch labels plus two gaps make a 6.25-inch-wide grid. Five rows plus four gaps make a 10.5-inch-tall grid. Centering leaves 1.125 inches on the left and right and exactly 0.25 inch above and below. If your printer needs more than 0.25 inch at either end, this exact five-row example may not fit.
Choose trim lines if a square outline helps you cut, or inspect trim marks for your preferred method. Because the top and bottom rows approach the printer margins, inspect guide visibility on the proof. Reducing to fewer rows is better than allowing clipped guides or shrinking the label without deciding to change its finished size.
Match the stock to the printer
Choose full-sheet adhesive stock intended for your printer technology. Inkjet and laser label materials are not automatically interchangeable. Follow the stock maker's loading and media-setting instructions and the printer's thickness limits. Do not assume that a home-printed paper label is waterproof, food-safe, or suitable for every container just because the layout is correct. Those properties depend on the stock, ink, adhesive, and intended use.
Make a plain-paper test before using the adhesive sheet. Avery's practice-sheet guidance likewise recommends a plain-paper proof at full scale. For this uncut-stock workflow, compare the measured label dimensions and cutter access. Let the final sheet dry or cool as directed before cutting, peeling, or stacking it. Try one label on the intended surface before making the full batch.
Print one sheet, then check the result
Generate and download the arranged PDF after reviewing the output summary. Open it with US Letter paper selected and print at Actual size or 100%. The PDF already contains the whole sheet: leave the viewer at one PDF page per paper side. Avoid another N-up setting. Adobe's page-size guidance confirms that Actual size prints without scaling; Fit can change the size.
Use plain paper for the first size check, measure a piece with a ruler, and confirm that nothing is clipped. Then print one sample on your intended stock with the correct media setting. Check the printer manual for the printable side, loading direction, and supported thickness. Save the downloaded PDF and keep your original artwork once the sample is correct. A screen preview verifies layout, but it cannot confirm your printer's physical feed or cutting accuracy.
Calculate your own sheet layout
Use the free sheet fit calculator to compare paper sizes, margins, gap and bleed for your finished dimensions.