How to Print 3x5 Cards on Letter Paper
Print four 3 x 5-inch cards on Letter paper with exact margins, gaps, and a dimensioned four-up layout. Check size before cutting a batch.
Four 3x5 cards fit on one Letter sheet
To print 3x5 cards on Letter paper, arrange four portrait cards in two columns and two rows. Each piece is 3 inches wide and 5 inches tall. This guide uses 8.5 x 11-inch portrait paper, 0.25-inch printer margins, and a 0.125-inch gap between cards. PrintGrid Pro produces the arranged PDF; your PDF viewer and printer then print the sheet at full size. The workflow suits recipe cards, study prompts, small signs, and other finished rectangular designs.
This is a cut-from-Letter workflow. It does not mean loading individual pre-cut 3 x 5 index cards into a printer. If you want to print directly onto loose index cards, check your printer's supported sizes and paper path. Do not assume that a printer accepting Letter cardstock also accepts small pre-cut cards.
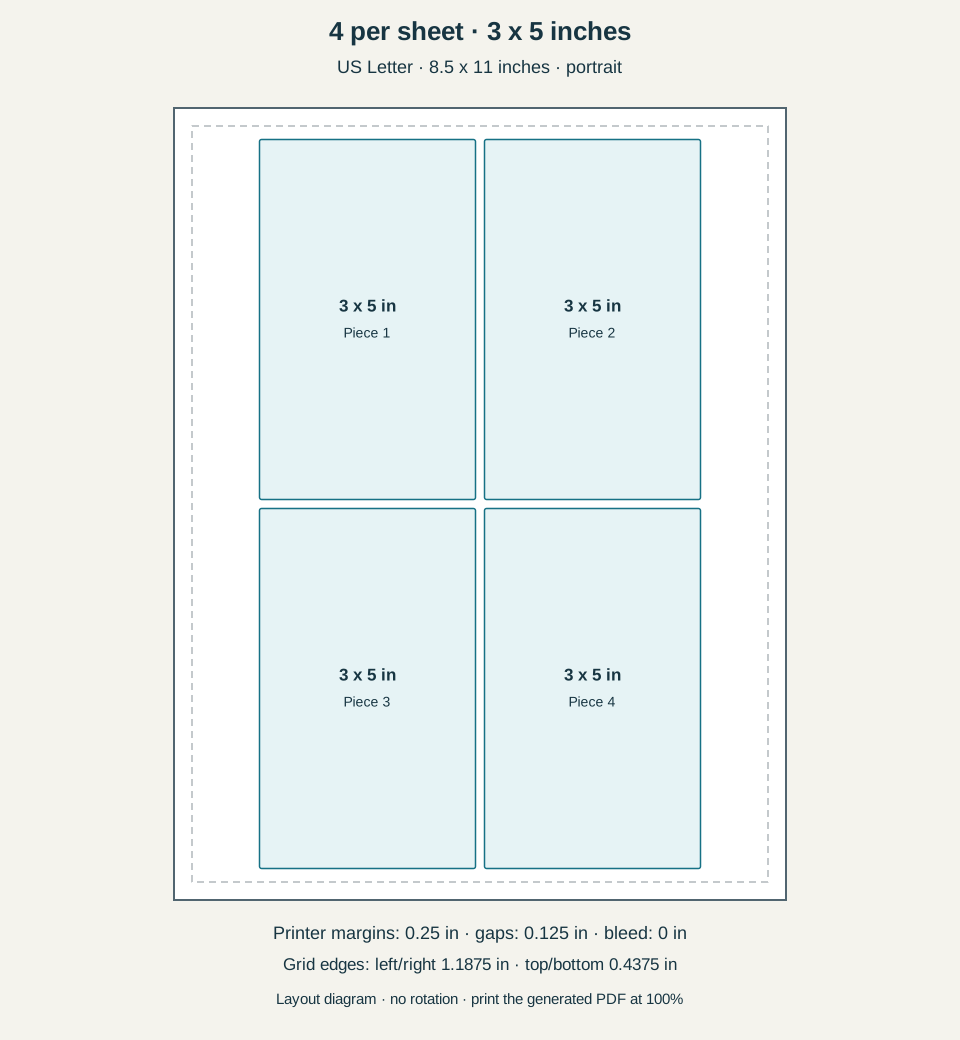
Exact layout settings in inches
| Setting | Value |
|---|---|
| Paper | US Letter, 8.5 x 11 inches, portrait |
| Each piece, width x height on sheet | 3 x 5 inches |
| Printer margins, all four sides | 0.25 inch |
| Horizontal and vertical gap | 0.125 inch |
| Bleed | 0 inches for this example |
| Rotation | Off for this diagram |
| Grid | 2 columns x 2 rows, 4 pieces |
| Actual centered grid distance from paper edges | Left/right 1.1875 inches; top/bottom 0.4375 inches |
| Print scaling | Actual size or 100%; one PDF page per side |
The 0.25-inch printer margins define the permitted area; the centered grid can leave more white space outside the pieces. Your printer may need larger margins. Increasing margins or gaps can reduce the count. These settings describe artwork without bleed and a fixed orientation, not a claim that every possible layout has the same capacity.
Prepare the finished card at a 3:5 ratio
Create the card in your design application at 3 x 5 inches and export a PDF, PNG, or JPEG. For raster artwork, a 900 x 1500-pixel portrait supplies 300 pixels per inch at that size. Keep text comfortably inset from the edges so the finished card remains easy to read after trimming. A deliberate white border works well for this zero-bleed example, especially for handwritten recipes or study notes.
If your design is landscape, prepare the matching 5 x 3-inch source and use the preview to check a suitable rotated arrangement. The diagram here specifically shows portrait 3 x 5-inch cards. Avoid stretching a landscape source into that portrait shape. The same paper can support different layouts, but the dimensions and grid need checking together.
Import and choose the copies you need
Upload your local source and confirm a 3-inch width and 5-inch height. Use Repeat one to make four identical cards. For four different recipe cards or study prompts, use Multiple designs with matching dimensions and rectangular shape, then set one copy of each. Check the thumbnails and quantities before generating the sheet. The app arranges your finished files; it does not compose recipe text or produce a spreadsheet mail merge.
If you import a PDF that already contains several cards on a page, confirm that you have selected the intended design rather than repeating an entire sheet. A single-card source gives the clearest control over physical size. Check aspect-ratio and resolution warnings early, while returning to the original file is still straightforward.
Enter the exact four-up settings
Choose Letter portrait and turn rotation off to match this diagram. Set all printer margins to 0.25 inch, Gap to 0.125 inch, and total quantity to four. The grid width is 3 + 0.125 + 3 = 6.125 inches. Its height is 5 + 0.125 + 5 = 10.125 inches. Centering places the grid 1.1875 inches from the left and right paper edges and 0.4375 inch from the top and bottom.
Those outer spaces are not new values to enter into the printer-margin control. They are the white space left after the app centers the grid within the permitted area. Keep bleed at zero for this example and inspect any cutting guides. If you change the margins, source orientation, or gap, rely on the resulting preview rather than treating four-up as guaranteed.
Choose cardstock and trim a sample
Check your printer's supported cardstock weight, thickness, and loading path before buying or loading a large pack. Select the media type recommended for the stock. A plain-paper proof checks geometry, but cardstock can feed differently, so print one card sheet on the final material too. Let ink dry as directed before cutting or writing on the cards. Avoid a thin printed frame near the cut if uneven borders would spoil the result.
Trim one card and measure both dimensions with a ruler. If all four cards are proportionally undersized, check scaling before editing the source. If the size is right but the text sits too near an edge, revise the artwork's safe area. For front-and-back cards, use the duplex printing workflow and test alignment before committing the batch.
Print one sheet, then check the result
Generate and download the arranged PDF after reviewing the output summary. Open it with US Letter paper selected and print at Actual size or 100%. The PDF already contains the whole sheet: leave the viewer at one PDF page per paper side. Avoid another N-up setting. Adobe's page-size guidance confirms that Actual size prints without scaling; Fit can change the size.
Use plain paper for the first size check, measure a piece with a ruler, and confirm that nothing is clipped. Then print one sample on your intended stock with the correct media setting. Check the printer manual for the printable side, loading direction, and supported thickness. Save the downloaded PDF and keep your original artwork once the sample is correct. A screen preview verifies layout, but it cannot confirm your printer's physical feed or cutting accuracy.
Calculate your own sheet layout
Use the free sheet fit calculator to compare paper sizes, margins, gap and bleed for your finished dimensions.