How to Print Wallet-Size Photos at Home
Make six 2.5 x 3.5-inch wallet photos on Letter paper. Follow exact spacing, source-ratio advice, and a dimensioned six-photo diagram.
Choose a wallet size before arranging photos
To print wallet-size photos at home, first decide the exact dimensions you need. This guide uses 2.5 x 3.5 inches, with six portrait photos on an 8.5 x 11-inch Letter sheet. Wallet prints are sold in more than one size, so measure your holder or ask the recipient before preparing a batch. A 2 x 3-inch photo is a different layout. This guide is for personal photo prints, not passport, visa, or official identification photos.
The six-photo arrangement uses three columns and two rows, a 0.125-inch gap, and 0.25-inch printer margins. There is generous space above and below the grid. That spare space is expected; the app centers the arrangement rather than stretching the pictures to fill the page. Keep the physical size fixed when comparing layouts.
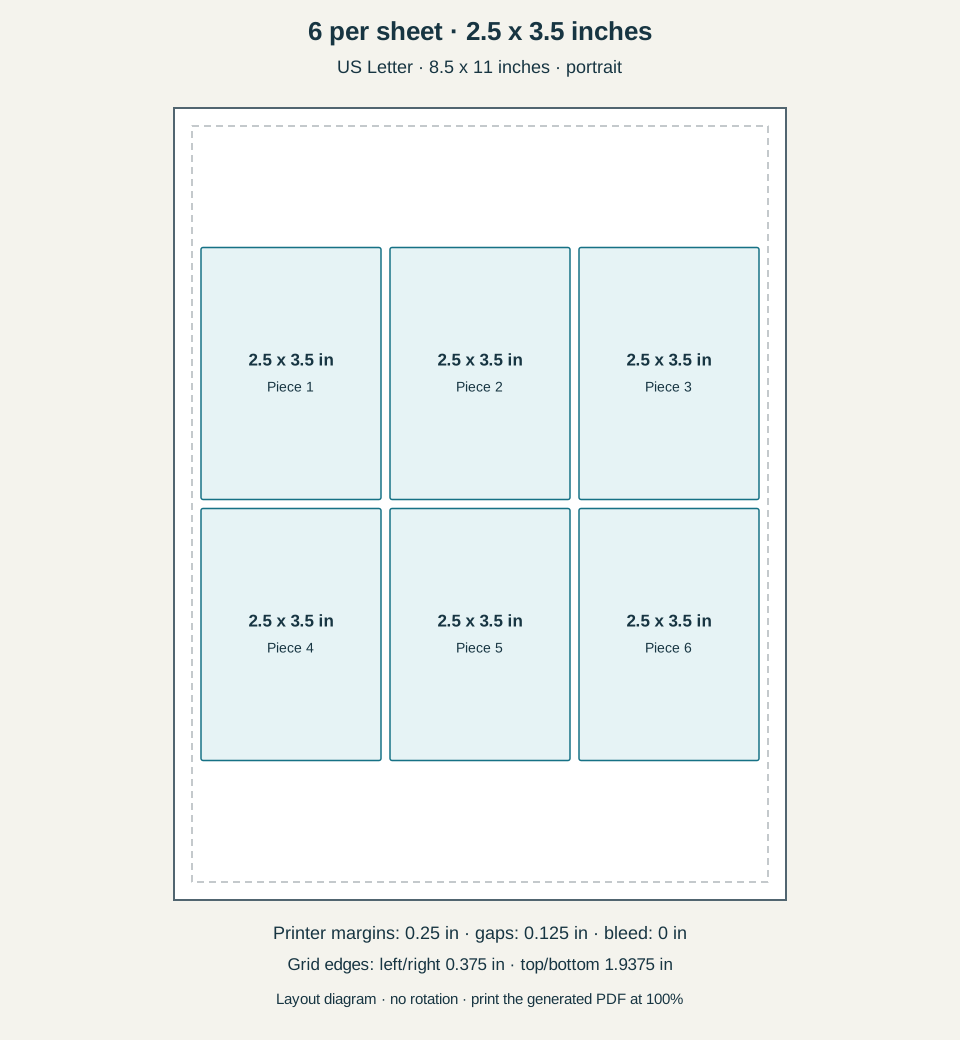
Exact layout settings in inches
| Setting | Value |
|---|---|
| Paper | US Letter, 8.5 x 11 inches, portrait |
| Each piece, width x height on sheet | 2.5 x 3.5 inches |
| Printer margins, all four sides | 0.25 inch |
| Horizontal and vertical gap | 0.125 inch |
| Bleed | 0 inches for this example |
| Rotation | Off for this diagram |
| Grid | 3 columns x 2 rows, 6 pieces |
| Actual centered grid distance from paper edges | Left/right 0.375 inches; top/bottom 1.9375 inches |
| Print scaling | Actual size or 100%; one PDF page per side |
The 0.25-inch printer margins define the permitted area; the centered grid can leave more white space outside the pieces. Your printer may need larger margins. Increasing margins or gaps can reduce the count. These settings describe artwork without bleed and a fixed orientation, not a claim that every possible layout has the same capacity.
Crop the portrait without stretching faces
A 2.5 x 3.5-inch portrait has a 5:7 ratio. Crop the source in a photo editor so the composition suits that shape. A 750 x 1050-pixel image supplies 300 pixels per inch at the chosen size. Use the original photo when possible and inspect it for focus and compression. Adding pixels to a small file does not restore missing detail. If the subject sits close to an edge, leave enough room for the intended trimming.
Do not assume that shrinking a 4x6 photograph automatically produces the same composition. Its aspect ratio differs, so it needs cropping or an intentional border. Decide that in the source file, then confirm the dimensions in PrintGrid Pro. Keep any decorative frame comfortably inside the edge because a narrow border makes small cutting variations more obvious.
Import one portrait or a family selection
Upload a JPEG, PNG, or PDF and confirm 2.5 inches wide by 3.5 inches tall. Use Repeat one for six copies of a portrait. Use Multiple designs for a selection of photographs sharing those dimensions and the same rectangular shape. Check quantities for each source, especially if you want two copies of three photos rather than six copies of the first image. Inspect the thumbnails before exporting.
If a dimension warning appears, check the ratio rather than forcing the image into the frame. The sheet workflow arranges finished designs; it does not retouch portraits. Prepare the crop, color, and border before importing. Keep the original files in a folder you can find again if you need a different selection later.
Build the six-photo Letter layout
Choose Letter portrait, turn rotation off, and use the measurements in the table. Three 2.5-inch columns plus two 0.125-inch gaps make a 7.75-inch-wide grid. Two 3.5-inch rows plus one gap make it 7.125 inches tall. Centering leaves 0.375 inch on each side and 1.9375 inches above and below. The printer-margin control remains 0.25 inch; the larger outer spaces come from the centered grid.
Set six total copies for one full sheet. Corner trim marks or trim lines can help identify the final edges, but inspect their placement in the preview. This diagram uses no bleed. If your artwork needs bleed for edge-to-edge cutting, prepare it in the source and recheck both the finished dimensions and the available space.
Check the holder and trim carefully
Print a plain-paper sample and cut one rectangle before using photo paper. Try it in the intended wallet sleeve, keepsake frame, or gift enclosure. If the holder is smaller, choose a new finished size deliberately and create another layout. Do not use the printer's Fit option as an approximate sizing tool because it changes every photo and all spacing together.
For the final sheet, choose photo paper supported by your printer and follow its media and drying instructions. Cut with a ruler and a suitable trimmer, keeping the printed faces protected from scratches. For full-size photo prints instead, follow the two 4x6 photos on Letter guide. A different size needs a different grid.
Print one sheet, then check the result
Generate and download the arranged PDF after reviewing the output summary. Open it with US Letter paper selected and print at Actual size or 100%. The PDF already contains the whole sheet: leave the viewer at one PDF page per paper side. Avoid another N-up setting. Adobe's page-size guidance confirms that Actual size prints without scaling; Fit can change the size.
Use plain paper for the first size check, measure a piece with a ruler, and confirm that nothing is clipped. Then print one sample on your intended stock with the correct media setting. Check the printer manual for the printable side, loading direction, and supported thickness. Save the downloaded PDF and keep your original artwork once the sample is correct. A screen preview verifies layout, but it cannot confirm your printer's physical feed or cutting accuracy.
Calculate your own sheet layout
Use the free sheet fit calculator to compare paper sizes, margins, gap and bleed for your finished dimensions.