How to Print 2x6 Photo Booth Strips
Print three 2 x 6-inch photo booth strips on Letter paper with exact margins, gaps, and a dimensioned layout for home cutting.
Start with a complete 2x6 strip
To print 2x6 photo booth strips, prepare a complete strip measuring 2 inches wide by 6 inches tall, then arrange three copies across portrait Letter paper. This guide uses 0.25-inch printer margins and a 0.125-inch gap between strips. PrintGrid Pro arranges the finished strip artwork on a sheet. It does not operate a photo booth, take a sequence of photographs, or build the strip's photo collage. Create the image sequence and any event caption before you upload.
Three strips fit across this example with useful space at the outer edges. Each is printed at the full 2 x 6-inch size rather than scaled to fill the sheet. The large blank area above and below the row is normal. If you are printing for an album sleeve or favor holder, measure that holder before finalizing the strip dimensions.
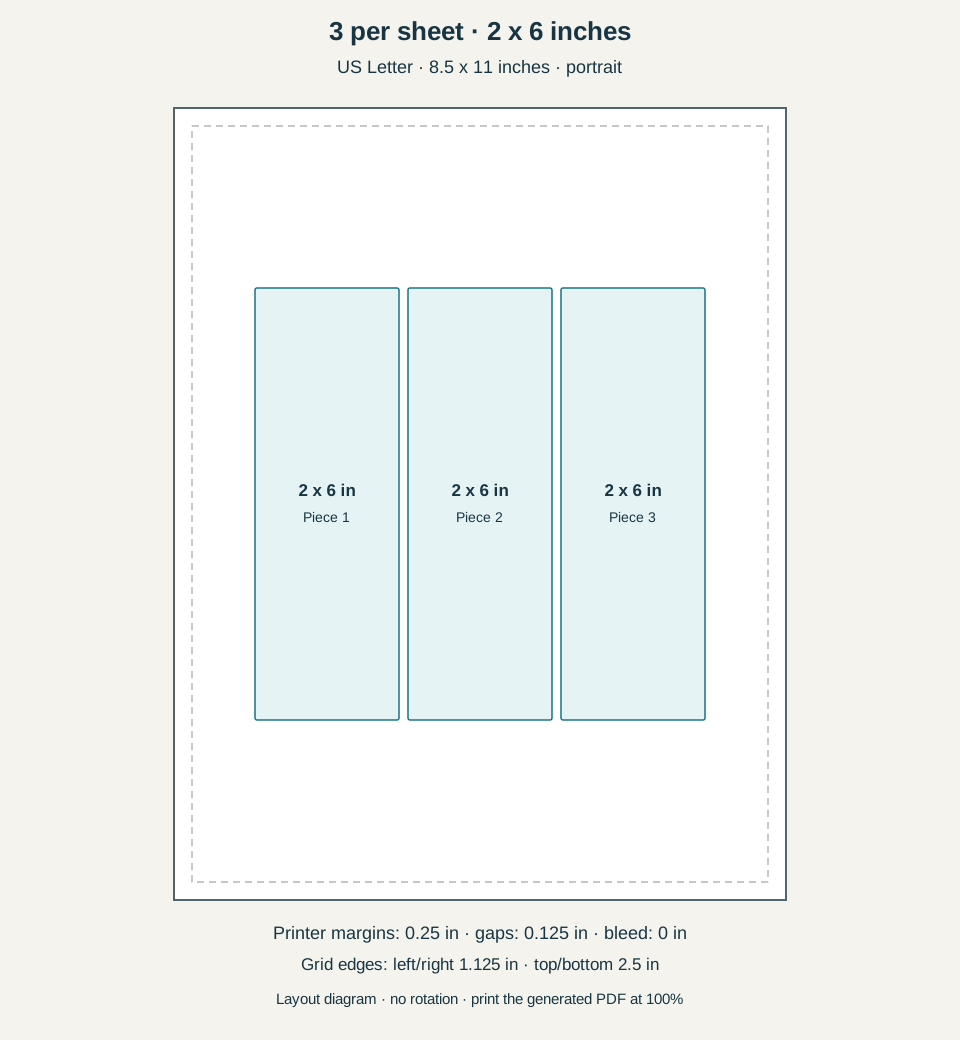
Exact layout settings in inches
| Setting | Value |
|---|---|
| Paper | US Letter, 8.5 x 11 inches, portrait |
| Each piece, width x height on sheet | 2 x 6 inches |
| Printer margins, all four sides | 0.25 inch |
| Horizontal and vertical gap | 0.125 inch |
| Bleed | 0 inches for this example |
| Rotation | Off for this diagram |
| Grid | 3 columns x 1 rows, 3 pieces |
| Actual centered grid distance from paper edges | Left/right 1.125 inches; top/bottom 2.5 inches |
| Print scaling | Actual size or 100%; one PDF page per side |
The 0.25-inch printer margins define the permitted area; the centered grid can leave more white space outside the pieces. Your printer may need larger margins. Increasing margins or gaps can reduce the count. These settings describe artwork without bleed and a fixed orientation, not a claim that every possible layout has the same capacity.
Prepare the photos and caption together
A vertical 2 x 6-inch strip has a 1:3 width-to-height ratio. A 600 x 1800-pixel file supplies 300 pixels per inch at this size. Assemble the photographs, borders, names, and date in your design application and export a JPEG, PNG, or PDF. Check that small caption text remains readable when viewed at approximately printed size. Leave a comfortable inset around faces and text so slight cutting shifts are less noticeable.
If you want white space between the individual photos inside a strip, include it in the strip design itself. The sheet's Gap control separates whole strips, not the photographs within each strip. For a source that already includes a surrounding white border, confirm whether that border is intended to remain inside the finished 2 x 6-inch piece.
Upload and confirm each strip's size
Choose Upload your design and check the source preview after import. Set width to 2 inches and height to 6 inches. Use Repeat one for three identical strips or Multiple designs for different strips of the same dimensions and shape. Review the quantities so that each desired strip appears the right number of times. This is useful for small event batches where several guests receive different finished collages.
If the imported file is a full page of strips, return to the design tool and export a single strip when possible. Repeating an already arranged page would create copies of the entire page, including its empty space. Check aspect-ratio and resolution warnings before you proceed; stretching a source to fit can distort faces and logos.
Use three columns on Letter paper
Select portrait Letter paper and turn automatic design rotation off for this exact arrangement. Set margins to 0.25 inch and Gap to 0.125 inch. Three 2-inch strips plus two gaps occupy 6.25 inches across. One row is 6 inches tall. The centered row begins 1.125 inches from either side and 2.5 inches from the top and bottom. The table and diagram show these physical dimensions together.
Set a quantity of three for one full sheet. Inspect the guides and all outer edges in the preview. Leave bleed at zero for this worked example. If you change the source to include bleed, the trim boundary and possibly the capacity must be checked again. A bleed setting does not extend a photograph beyond its original edges.
Cut long edges without losing the caption
Use paper compatible with your printer and suited to the finished strip. A plain-paper proof is enough to check dimensions and ordering; photo paper needs its own media setting and handling instructions. After the print is ready to handle, align the long cuts with the guides. A paper trimmer can make repeated straight cuts easier, but use the tool according to its instructions and keep the sheet supported.
Trim one strip completely and measure its width and height before cutting the rest. Check that the top and bottom captions have the intended space. If the whole strip is undersized, review print scaling. If only one photo looks cropped, fix the collage source. For a shorter keepsake format, see the wallet-size photo workflow rather than changing the strip dimensions by eye.
Print one sheet, then check the result
Generate and download the arranged PDF after reviewing the output summary. Open it with US Letter paper selected and print at Actual size or 100%. The PDF already contains the whole sheet: leave the viewer at one PDF page per paper side. Avoid another N-up setting. Adobe's page-size guidance confirms that Actual size prints without scaling; Fit can change the size.
Use plain paper for the first size check, measure a piece with a ruler, and confirm that nothing is clipped. Then print one sample on your intended stock with the correct media setting. Check the printer manual for the printable side, loading direction, and supported thickness. Save the downloaded PDF and keep your original artwork once the sample is correct. A screen preview verifies layout, but it cannot confirm your printer's physical feed or cutting accuracy.
Calculate your own sheet layout
Use the free sheet fit calculator to compare paper sizes, margins, gap and bleed for your finished dimensions.